In this tutorial, I will show you, how to install Oracle VM VirtualBox on Mac. For this demonstration, the version used for Oracle VM VirtualBox is 6.0.14 and for Mac is macOS Catalina. To start the installation, first you need to download the Oracle VM Virtual Box from one of the links below:
Now follow these steps to install the Oracle VM Virtual Box on macOS Catalina.
VirtualBox-6.0.14-133895-OSX.dmg
Double click on this file, then it will extract the installation executable and then the following screen will appear.
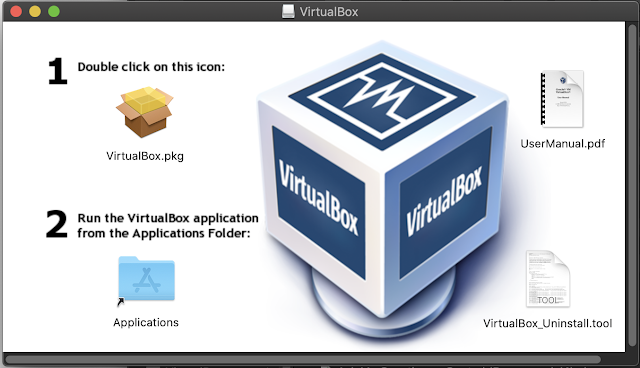
2. As shown above, double click on the icon VirtualBox.pkg, and it will prompt you to begin the installation with the screen shown below:
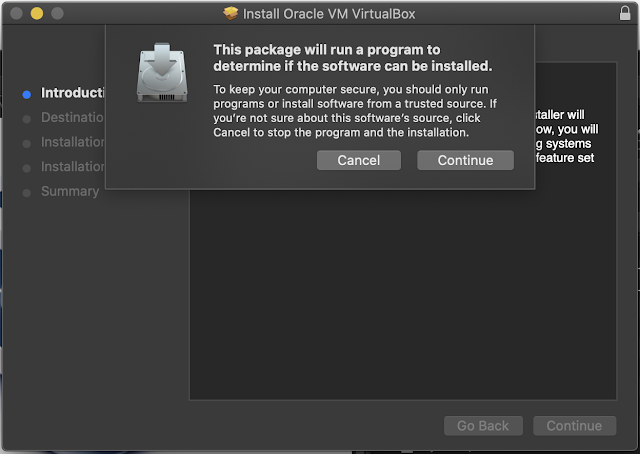
3. Click on the Continue button, then again click on the Continue button on the parent window.
4. Now on the next step click on the Install button.
5. The system will ask you the enter the password for the current user. Enter the password and click on the Install Software button.
6. Then it will install the Oracle VM VirtualBox on your Mac and maybe you will end up with the following screen:

Don't worry it is just a warning, your installation has been completed. Now go to the Application Launchpad to start the Oracle VM VirtualBox on Mac.

You may also like:
Now follow these steps to install the Oracle VM Virtual Box on macOS Catalina.
Steps to Install Oracle VM VirtualBox on Mac
1. After downloading the VirtualBox from the above-mentioned sources, you will get the DMG file with name something like as shown below:VirtualBox-6.0.14-133895-OSX.dmg
Double click on this file, then it will extract the installation executable and then the following screen will appear.

2. As shown above, double click on the icon VirtualBox.pkg, and it will prompt you to begin the installation with the screen shown below:

3. Click on the Continue button, then again click on the Continue button on the parent window.
4. Now on the next step click on the Install button.
5. The system will ask you the enter the password for the current user. Enter the password and click on the Install Software button.
6. Then it will install the Oracle VM VirtualBox on your Mac and maybe you will end up with the following screen:

Don't worry it is just a warning, your installation has been completed. Now go to the Application Launchpad to start the Oracle VM VirtualBox on Mac.

You may also like:

Post a Comment